The iPhone 11 is a powerful, fast, and aesthetically beautiful smartphone. As soon as you upgrade to the iPhone 11, you will notice that it has a fantastic camera and better battery life than its predecessor, the iPhone XR. Despite having an improved battery life, many people have reported charging issues with their iPhone 11, iPhone 11 Pro, and iPhone 11 Pro Max. Some common issues involve the iPhone 11 not being able to charge wirelessly or stop charging after a certain percentage. Besides the iPhone 11 lineup, many users are facing the same issues with their iPhones running on different versions of the iOS 13. There may be instances when your iPhone 11 bumped into some charging issues after upgrading to a system update.
If you’re tired facing the charging issues with your iPhone 11, you’ve come to the right place to sort these problems. We’ve included some simple solutions that will help you deal with common charging problems and will also help you fix charging issues post an iOS update on your iPhone 11.
Here’s our guide on how to fix the iPhone 11 not charging issues.
- The iPhone 11 not charging or charging very slowly
- iPhone 11 not charging past 80%
- How to fix the iPhone 11 not charging wirelessly issue?
- iPhone 11 not charging after getting wet/liquid is detected in the Lightning port
Disclaimer: Proceed at your own risk, TechieTechTech will not be responsible if anything goes wrong with your device.
iPhone 11 not charging or charging very slowly
If your iPhone 11 is not charging when plugged in or charging very slowly, follow the steps mentioned below to fix the issues. Also, try charging your iPhone after each step.
1. Check the Lightning cable and USB adapter
- Firstly, make sure that you’re using the Lightning cable and adapter that came with your iPhone 11. If you’re using a third-party Lightning cable or an adapter, please ensure that it has the MFi certification (Made for iPhone, iPad, and iPod). Using accessories that are not MFi certified can damage your Apple devices over time.
- You must check the Lightning cable and the adapter for signs of damage, like breakage, exposed wire, or any bends. Also, the problem can be due to a loose connection, therefore, re-check that you’ve connected the cable properly to your iPhone.
If either your Lightning cable or adapter turns out to be faulty, or if you’re using the one that is not MFi certified, you must replace them with the Apple or MFi certified accessories.
Check out the fast chargers for iPhone XR, XS, and XS Max.
2. Try a different power source
After you’ve checked your Lightning cable and adapter and you’re still facing the charging issue, try switching to a different power source. A ruptured power source could also be an underlying cause of this problem. Unplug the charger from the current power source and try out a different wall power outlet.
3. Clean the Lightning port
Sometimes dirt or debris accumulate in the charging port over time and can cause charging issues on your iPhone. Use a flashlight to peep inside the Lightning port and remove the debris with a clean toothbrush or an anti-static brush. Never, I repeat never use a needle or any other pointed object to clean the Lightning port as it can severely damage the port. Once the Lightning port is free from all the dirt and debris, a smooth connection will be restored between your iPhone and the charger. Plug the charger firmly to your iPhone and try charging it again.
Most of us would think that we face charging issues only because of some faulty hardware, but that’s not always true. Apart from the hardware, software issues can also cause charging problems with your iPhone. You might get charging issues after you updated iOS on your iPhone or some software-related bug might have ruined its normal charging process. Here are some ways to fix the software issues on your iPhone11.
4. Force Restart your iPhone 11
Many Apple users have reported that they were able to fix the charging issues on the iPhone 11 series by doing a force restart on their devices. Rebooting can fix some minor glitches and software issues that are causing trouble to your iPhone, without deleting any data.
Follow the steps mentioned below to Force Restart your iPhone 11:
- Quickly press and release the Volume Up button.
- Quickly press and release the Volume Down button.
- Hold the Power/Side Button even if you see Slide to Power Off.
- Once the Apple logo appears, release the Power/Side button.
Once your iPhone is rebooted, try to charge it again and see if the issue has been resolved.
5. Erase all the data from your iPhone 11
You can delete all the stored data, including apps, saved passwords, and restore your iPhone to the factory settings by performing a Hard Reset on your iPhone. It will restart the device and refresh the RAM. It is particularly helpful in situations when your device screen has frozen and refuses to wake up.
It’s worth mentioning that you should consider doing the hard reset on your iPhone only after you’ve tried to force restart your device and nothing worked for you. Also, make sure to back up your iPhone’s data as this process will wipe off all the stored data.
Follow the steps mentioned below to erase all the data from your iPhone 11:
1. Go to Settings.
2. Tap on the General tab.
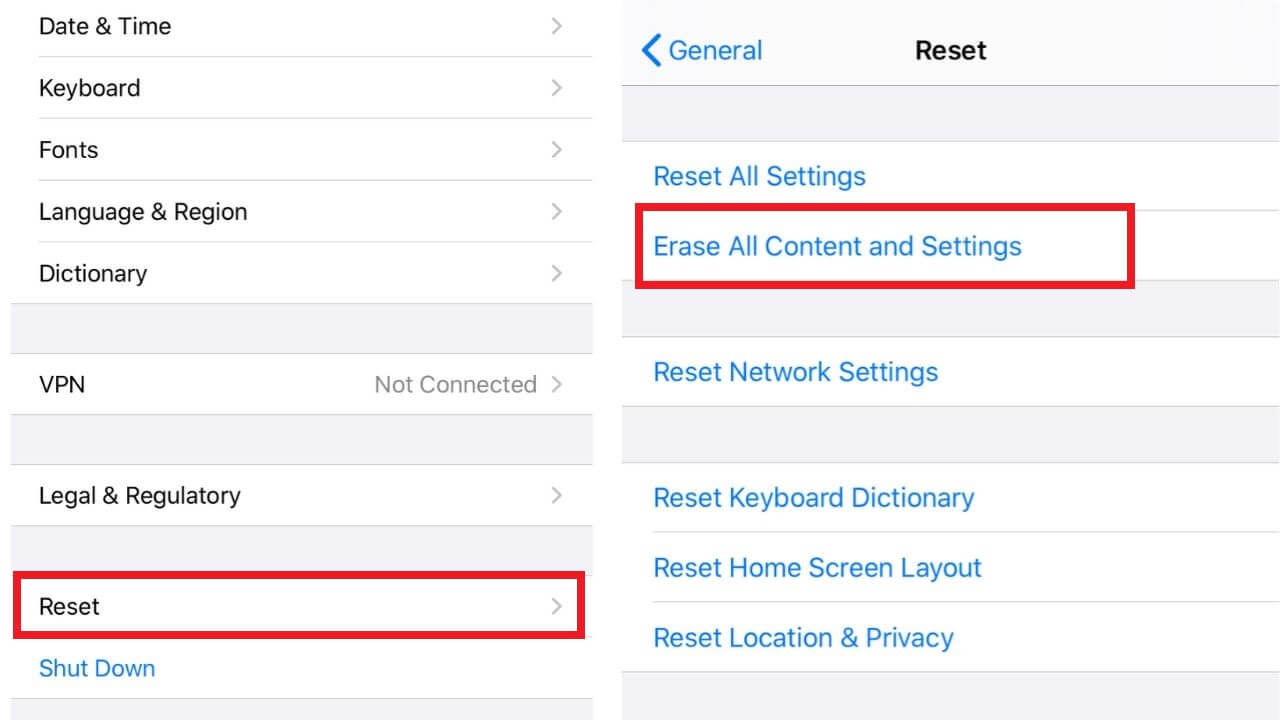
3. Tap on the Reset option available at the bottom of your screen.
4. Select Erase All Content and Settings option.
5. A pop up will appear asking if you want to back up the data or erase it right away.
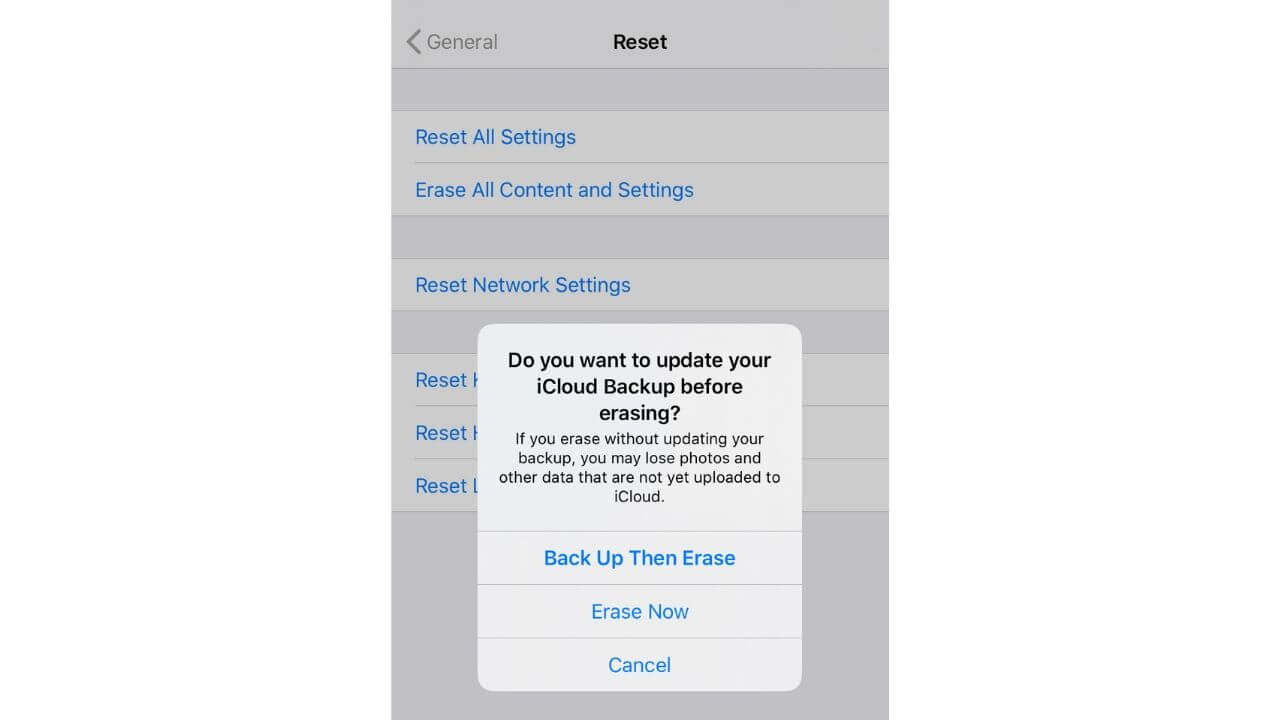
6. Confirm your decision and it will make the Erase iPhone option available on the screen.
7. Confirm the reset of your iPhone to the factory settings. The process would take a few minutes to complete.
Once you are done with the process, try charging your iPhone again.
6. DFU Restore iPhone 11
If you’ve tried all the above steps and nothing has helped you fix the charging issues on your iPhone 11, perform a DFU (Device Firmware Update) Restore. Doing this will reload the software and firmware of your iPhone. It is the deepest type of restore that can be done on an Apple device.
You can use iTunes or iCloud to backup your device. Make sure you do not skip this step, otherwise you’ll lose all of your data.
Firstly, connect your iPhone to a laptop or a computer using a USB cable.
- Quick-press the Volume Up button.
- Quick-press the Volume Down button.
- Hold the Side button till the screen goes black.
- Hold the Side button and Volume down button simultaneously.
- After 5 secs, release the Side button and continue to hold the Volume Down button.
- If you hold the Side button for a long time, Apple Logo will appear on the screen.
While you are performing the above steps, make sure:
- Nothing is displayed on your iPhone’s screen when it’s in the DFU Mode.
- If you get the Apple logo on your screen, you need to retry the process.
- If you get a message displaying -connect your device to iTunes, you need to retry the above steps.
To exit the DFU mode, you need to force restart your iPhone 11.
The steps for performing a DFU restore are subject to the iPhone model that you’re using, make sure to check out
our detailed guide on how to put any iPhone model in DFU mode.
6. Still no luck? Head to the Apple Store
If you’ve performed the DFU restore and you’re still facing the charging issues, then there might be some problem with the Lightning port or other internal components of your iPhone. Make sure that you head to the Apple store instead of looking for some other cheaper alternatives as they can further damage your iPhone.
iPhone 11 not charging past 80%
All of us have the habit of charging our phones to 100%, but it’s said that doing so can overstress lithium batteries, which eventually results in wearing out their lifespan. We all know that almost every smartphone, including the iPhone, tends to get a little warm while it charges. It’s worth mentioning that there’s a difference between an iPhone that’s slightly warm and the one that’s overheating. If your iPhone gets overheated very often, make sure to check out our iPhone overheating guide to know the exact reason and find a solution.
Reasons why your iPhone stops charging after 80%
1. Your iPhone is too warm
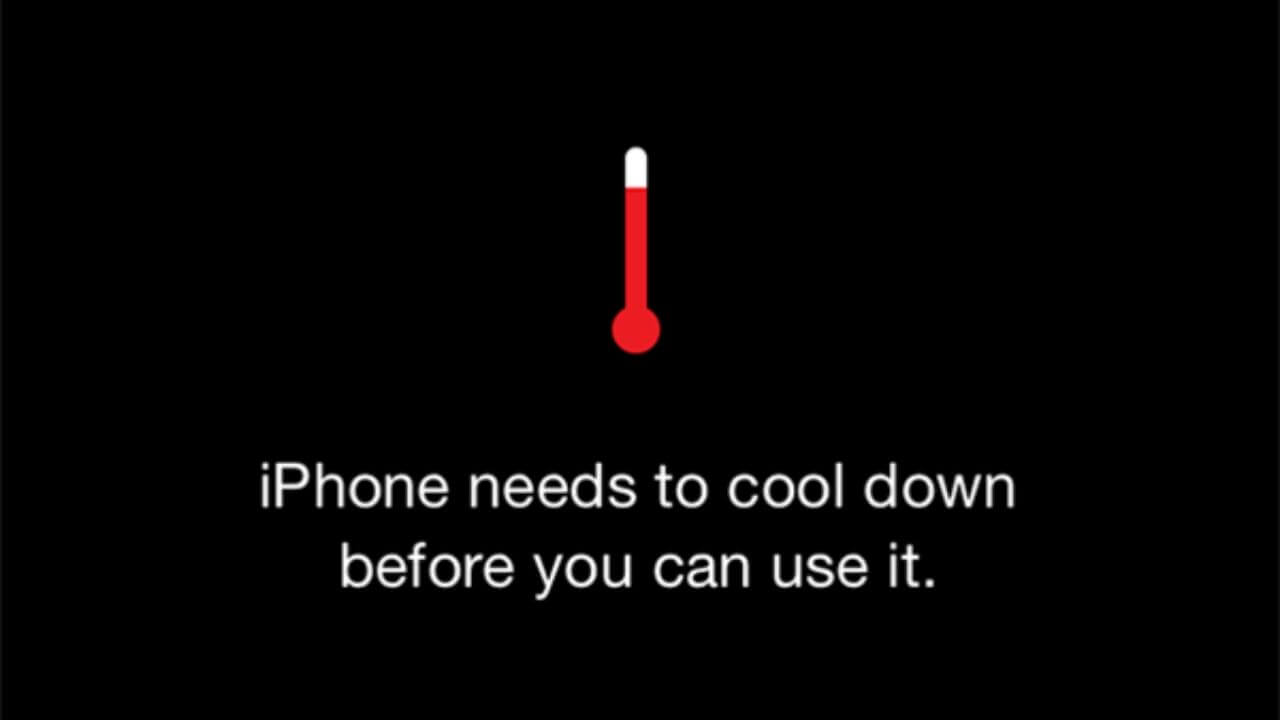
Your iPhone can stop charging if it exceeds a certain temperature threshold. If you’ve been playing CPU intensive games or if your iPhone is exposed to sunlight for a long time and then put on charge, or if you’re charging your iPhone in a particularly warm location, it will automatically stop charging past 80%. iOS will mitigate the problem by not allowing your phone to charge after 80%, as it will put the battery at risk.
2. Optimized Battery Charging in iOS 13
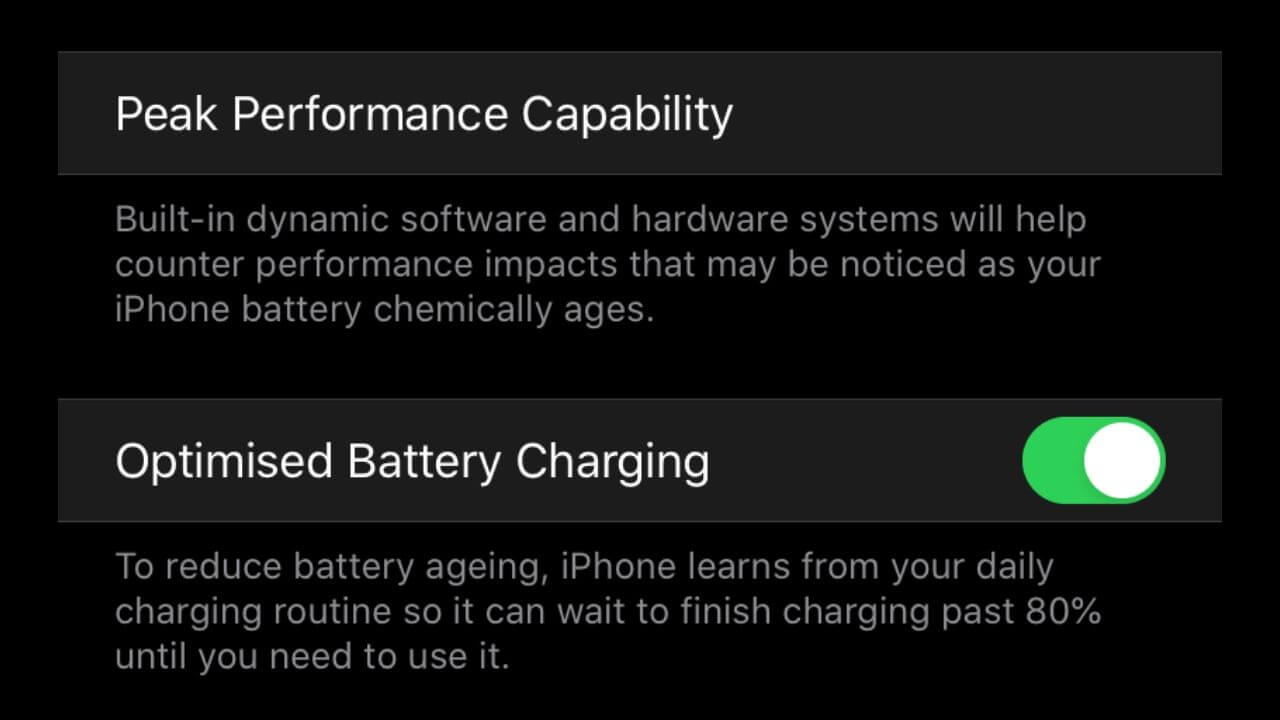
To avoid overstressing of the battery and extend its lifespan, Apple has introduced the Optimized Battery Charging feature in the iOS 13. If the iPhone’s battery gets too warm during charging, the iOS might limit charging above 80% to slow down the process of battery aging. This is the reason why sometimes your iPhone 11 gets charged all the way and then suddenly stops at 80 percent. The optimized battery charging feature is turned ON by default when you set up your iPhone 11 or update any iPhone to iOS 13.
How to fix iPhone 11 not charging after 80% issue?
1. Cool Down your iPhone
If your iPhone gets too warm, you can follow the steps mentioned below to cool it down:
- Turn your iPhone OFF
- Unplug it from charging
- Remove the case
- Move it to a cooler location
We would like to mention that whenever you’re trying to cool down your iPhone, never blast cooled air at your iPhone. Also, some people might advise you to put your iPhone inside a freezer or a fridge to cool it down, but make sure you never give it a try. This is because sudden changes in the temperature can cause condensation that might damage or even destroy your iPhone.
If the problem still persists, make sure to check our detailed troubleshooting steps on how to cool down an iPhone.
2. Turn OFF “Optimized Battery Charging”
If your iPhone is running on iOS 13, the Optimized Battery Charging feature will be enabled by default. Although this feature helps to extend the lifespan of the battery, it can prevent your iPhone from charging past 80% at certain times. Therefore, you can disable this feature to check if the charging continues up to 100 percent or not.
Follow the steps mentioned below to disable Optimized Battery Charging on iPhone 11:
1. Head to Settings > Battery
2. Tap Battery Health
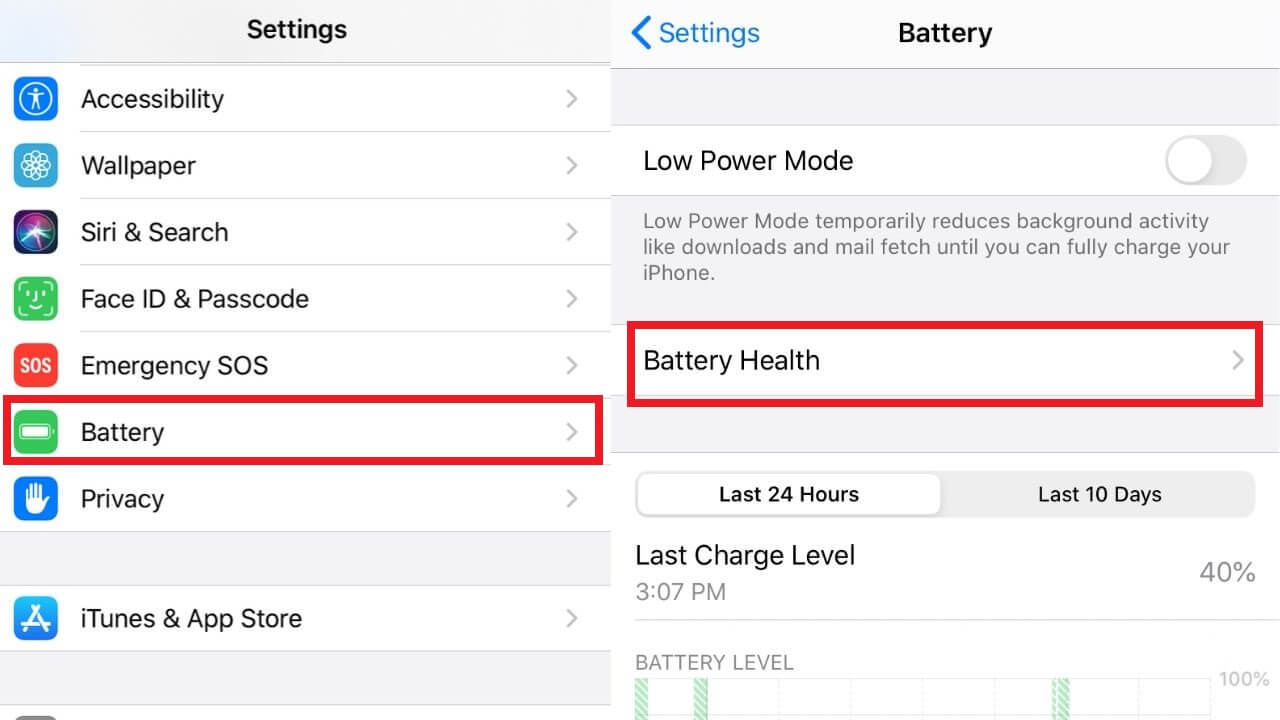
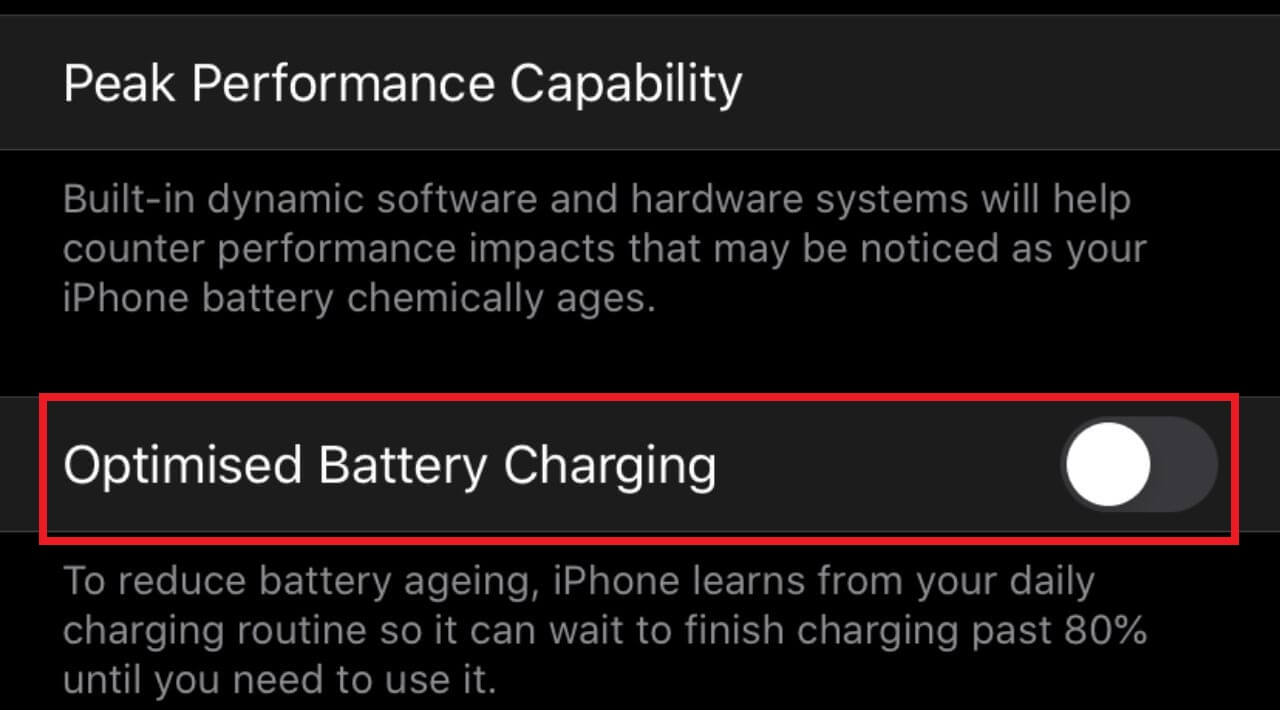
3. Turn the slider off for Optimized Battery Charging
4. If the problem still persists after you’ve disabled this feature, you can turn it ON and allow it to extend the lifespan of the battery.
Looking for the correct way to fix a faulty battery? Check out our guide on how to calibrate your iPhone’s battery.
Don’t miss our 20 tips on how to improve iPhone battery health in 2020.
iPhone 11 not charging wirelessly
This could be another issue that you might face with the iPhones running on iOS 13. Many Apple users have reported wireless charging issues with the iPhone 11 series on the Apple Support Forum. Some users have reported that their iPhone won’t charge when placed on a wireless charging pad or a stand. While some users have said that when they place the iPhones on the wireless charging pad, the battery icon disappears, and the charging stops right after that.
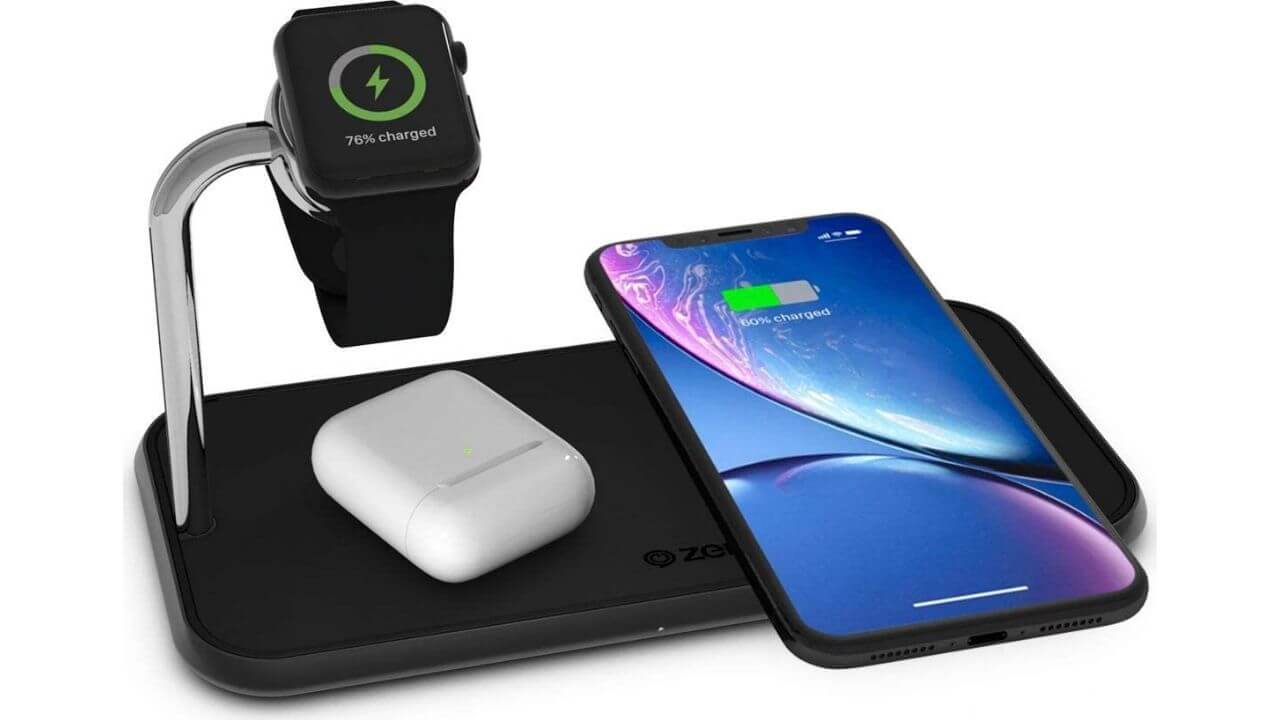
Here are some simple solutions that will help you fix the iPhone 11 not charging wirelessly issue:
1. Restart your iPhone
This is something which comes in the mind of every user, whenever anything goes wrong with their smartphones. And yes, this simple hack can help you fix those minor issues that accumulate over time, and it can also help you get rid of the wireless charging issues on your iPhone 11. Once you have rebooted your iPhone, try charging it wirelessly to check if the problem is solved.
2. Make sure that you’re using an efficient wireless charger
There are many wireless chargers available in the market right now, but not all of them can charge your iPhones efficiently. Here are some tips and tricks that you should follow while using a wireless charger for your iPhone:
- Make sure that you’re using a Qi-enabled wireless charger.
- Make sure that you’re not using a faulty wireless charger. It can be possible that there’s an issue with the wireless charger and not your iPhone. Try charging another wireless charging compatible device with the same charger. If the charger turns out to be faulty, use a different wireless charger to power-up your iPhone 11.
- Place your iPhone on the “sweet spot” on the wireless charging pad. Many wireless chargers do not work properly if the device is not placed in a proper indentation.
- If your phone vibrates while you get a call or any other notification, it might shift its position. This could cause the wireless charger to stop providing power to your iPhone. To avoid such issues, you can turn off the vibration or use a good wireless-charging compatible case to prevent movement.
Don’t miss our roundup for the best multi-device wireless charging stations in 2020.
3. If you’re using a case, make sure it supports wireless charging
If you’re wirelessly charging your iPhone 11 with a case, make sure of the two things:
- The wireless charger is case-friendly. Also, check the maximum thickness of the case the charger supports.
- The case supports wireless charging. Make sure its thickness lies within the acceptable range of the wireless charger.
Both things are required to get a hassle-free wireless charging experience. Also, if your case has got some metal accessories, try removing them as not all the wireless chargers are designed to work with them.
4. Update iOS
Whenever we feel that our iPhone is slowing down or we come across any random issue, we try updating iOS, isn’t it? And yes, updating iOS can fix the iPhone 11 charging issues and will help reduce the possibility of other bugs too.
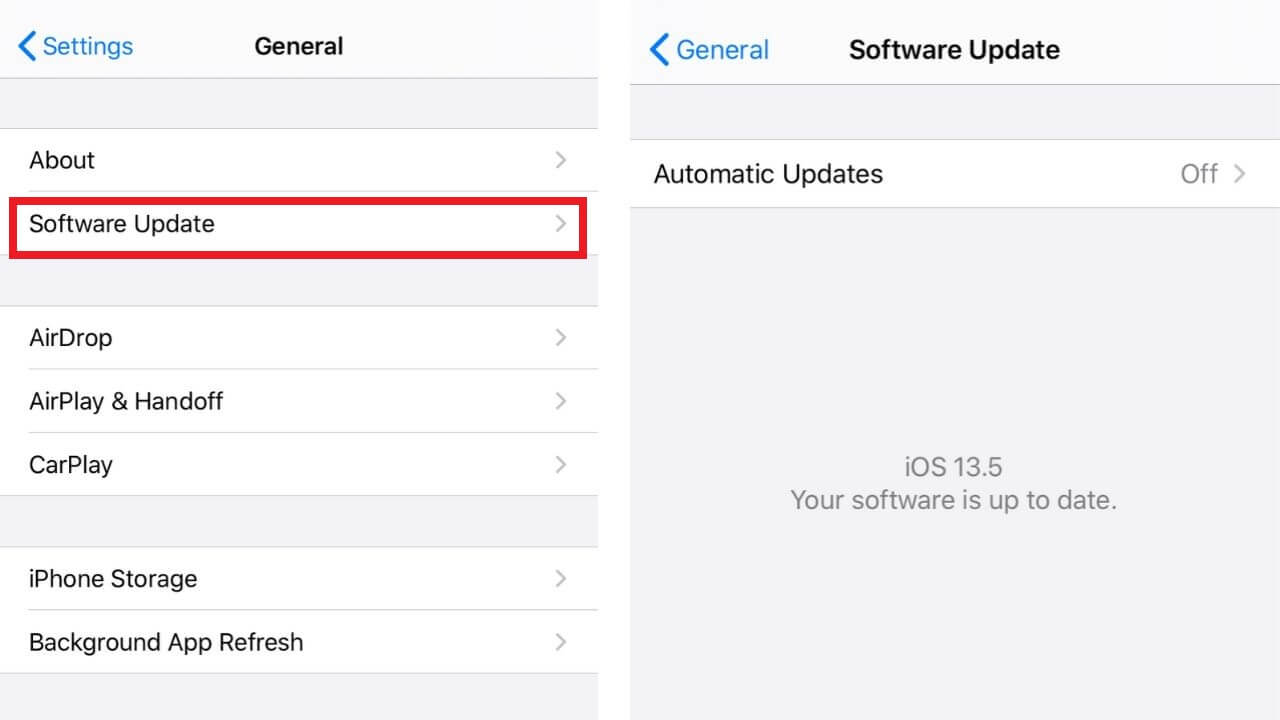
Follow the mentioned steps to check if any update is available for your iPhone.
- Head to Settings.
- Tap on the Software Update.
- If any update is available, download and install it.
Make sure you have enough storage space available on your iPhone to download the update. Otherwise, try freeing up the storage by moving your files to your PC or a laptop.
You can follow the same steps to fix wireless charging issues on any iPhone that supports wireless charging, including the latest iPhone SE 2020.
iPhone 11 not charging after getting wet/ after liquid is detected in the lightning port
Although iPhone 11 is a water-resistant device, it doesn’t mean that your iPhone cannot suffer from liquid damage. After all, your iPhone 11 is water-resistant and not completely waterproof. There may be instances when your iPhone stopped charging after it got wet in the shower or a swimming pool. When you connect a Lightning cable or any other accessory to your iPhone, your iPhone will show up a warning if the liquid is detected in the Lightning port.
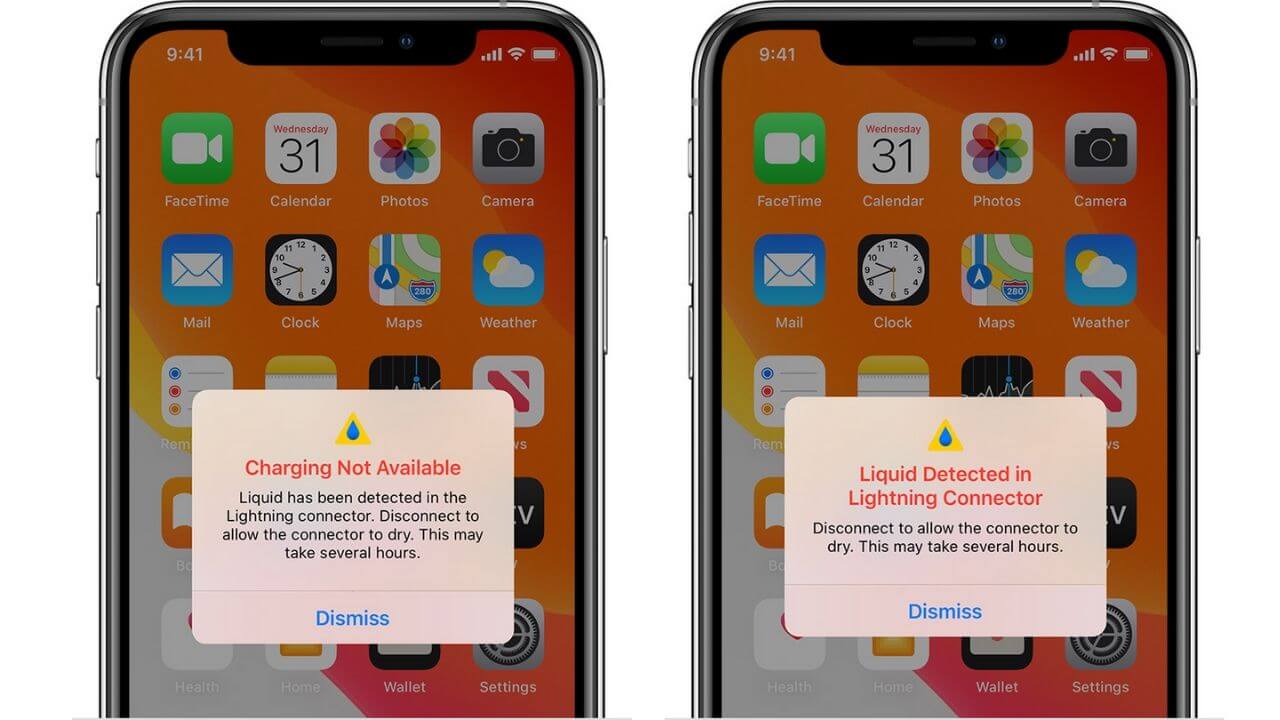
In such situations, the charging and accessory connection are not available until both the Lightning port and accessory are dry. This is done to protect your iPhone and the accessory from any severe issues. Make sure that you do not charge your iPhone while the Lightning port is wet as it can cause permanent damage to the Lightning port or the cable.
If your iPhone 11 or Lightning cable/accessory is wet?
If either your iPhone or Lightning cable/accessory is wet, you should immediately unplug all the accessories, and don’t plug them back till they are completely dry.
How to dry your iPhone?
- Hold the iPhone in your hand with the Lightning connector facing down and gently tap your iPhone against your hand to remove the excess liquid.
- Let your iPhone air dry for at least 30 minutes.
- Now, try charging your iPhone or connect a Lightning accessory.
- If the liquid detection alert pops up again, it means the liquid is still there in the Lightning port or under the pins of the Lightning cable.
- Keep the iPhone in a dry area with airflow for up to a day. You can try to charge your iPhone or connect a Lightning accessory to check if it’s working or not. Your iPhone might take up to 24 hours to dry completely.
When you’re trying to dry your iPhone, Apple recommends not doing any of the following things:
- Do not put a foreign object, like a cotton swab or paper towel inside the Lightning port.
- Do not use compressed air, a hairdryer, or an external heat source to dry your iPhone.
- It’s very common that people may advise you to put your iPhone into a rice bag overnight, but Apple does not recommend going about this process. The small particles of rice can damage your iPhone.
Note: The best way to dry your iPhone is to leave it in a cool and open place and let it air dry.
Now, what if you don’t have several hours to let your iPhone dry? What if there’s an emergency and you want to use your iPhone?
How to charge your iPhone if it’s wet?
You can do one of the following things in case of an emergency:
- If you’ve got a wireless charger, it can help you charge your iPhone 11 while it’s wet. Make sure that you keep in mind these two important things:
- The back of your iPhone is completely dry.
- Use a Qi-certified wireless charger.
- Although you shouldn’t charge your iPhone while it’s wet, you can still reconnect the iPhone to the Lightning cable in case there’s an emergency. There’s an option to override the liquid detection and charge your iPhone while it’s wet. It’s worth mentioning that if you opt for this process, you run the risk of permanently damaging your iPhone.
How to override liquid detection in iPhone 11?
- Reconnect the Lightning cable or accessory shortly after the warning appears.
- When liquid detection alert pops up again, Tap on the Emergency Override
What to do if the Liquid Detection alert appears every time and your iPhone is not wet?
There may be instances when you are sure that your iPhone, Lightning port, and the Lightning accessory are dry, but your phone still shows up the liquid detection alert. If such a situation arises, there’s a strong chance that your iPhone’s Lightning port or the accessory that you’re trying to use is damaged. You must head to the accessory manufacturer if you’re using a third-party cable or accessory, or the Apple Store if you’re using the Apple Lightning cable or accessory.
With this, we come to the end of our guide on how to fix iPhone 11 charging issues. We hope it has helped to get rid of any charging issues that you’ve been facing on your iPhone 11. Also, you can follow this guide to fix common charging issues on any iPhone, iPad, or iPod Touch. Don’t forget to share this article with all the iPhone users you know and help them fix those irritating charging issues.

